


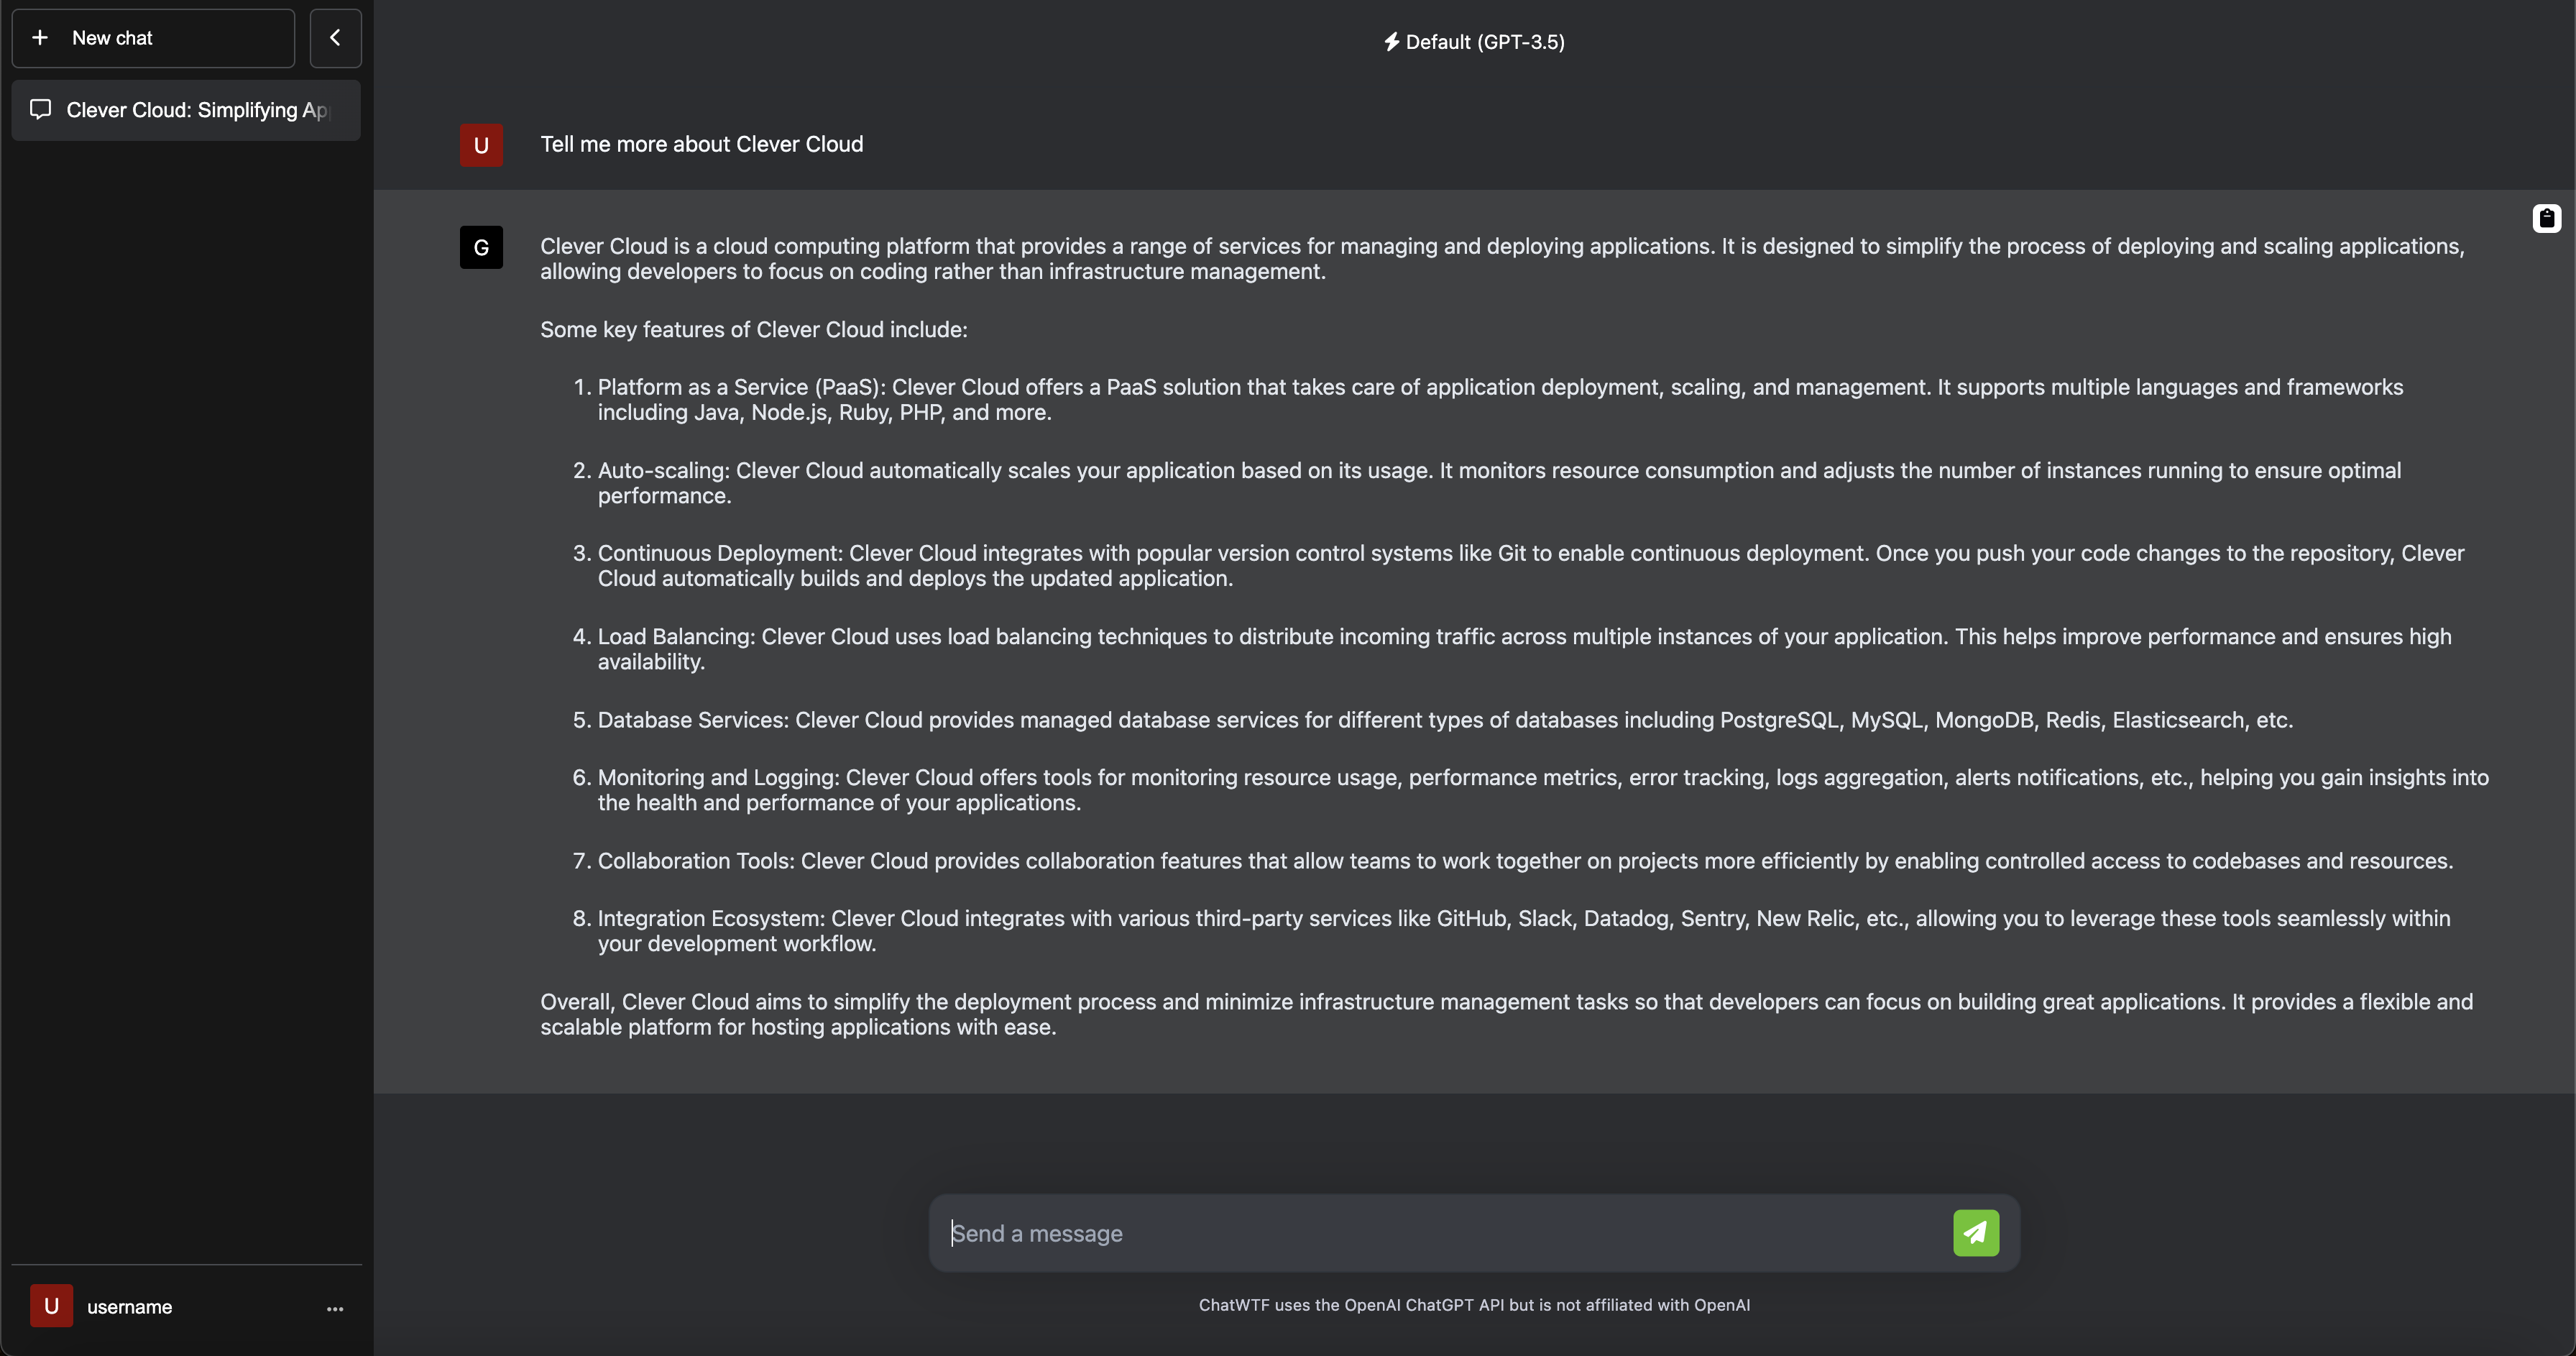
Since last year, OpenAI has been in the news with its large language models (LLM), notably GPT-3.5 and GPT-4, available through ChatGPT. But you can also include them within your own applications thanks to an API. Here’s an example of how you can take advantage of it on Clever Cloud.
We’ll use the open source chat-wtf project, created by Unconventional Coding, who detailed the conception stages in a series of videos. It is primarily based on the PHP language and data storage via sessions, SQLite or MySQL, according to user choice.
An open-source ChatGPT, you can use on demand
It requires you to use the OpenAI API, but you may look at compatible models if you’re more daring. The settings file also allows you to specify a “system message”. So, you can provide the AI with informations about you or your expectations, which it should take into consideration when answering your questions.
This PHP application has not been developed in any particular way for Clever Cloud, but you can host it on our infrastructure in just a few minutes, configure it according to your needs, stop and start it on demand. Here’s how.
- Create a Clever Cloud account (and get 20 euros in credits)
To get started, you’ll need a Clever Cloud account and an OpenAI API key. You can create the application and follow this tutorial using our web interface, the Console, but also through our open source CLI: Clever Tools. That’s what we’ll describe below.
Getting the code and configuration
We’ll assume that your machine is running git and a recent version of Node.js. If you haven’t yet installed Clever Tools on your system, type (with system administrator rights, or sudo if necessary):
npm i -g clever-tools
clever login
Once logged in, you can check that everything has gone smoothly with the following command:
clever profileThen you can create a fork of chat-wtf that can be deployed on Clever Cloud from your GitHub account. In this guide, we’ll clone the repository locally and create a Clever Cloud application in it. A remote required for its deployment will be automatically added:
git clone https://github.com/unconv/chat-wtf.git && cd chat-wtf
clever create -t php chat-wtf
Thus, you have a local copy of the latest version of the chat-wtf application, which you can configure to match your needs. Rename settings.sample.php to settings.php. We’ll start with some minor modifications.
Put in the following content to use environment variables:
<?php
return [
    "api_key" => getenv("OPENAI_API_KEY"),
    "system_message" => getenv("SYSTEM_MESSAGE"),
    "model" => "gpt-3.5-turbo",
    "base_uri" => "",
    "storage_type" => "session",
];
Edit the .gitignore file and remove settings.php so that it can be deployed with your application. Now that it’s configured, you only need to set the environment variables required to ensure it works properly, and then deploy. Note that it runs on PHP 8.x. We’ll be using the 8.2 branch:
clever env set CC_PHP_VERSION "8.2"
clever env set OPENAI_API_KEY "Your OpenAI API key"
clever env set SYSTEM_MESSAGE "Your system message"
git add . && git commit -m "First deploy"
clever deploy && clever open
Once the environment variables have been set, we perform a simple Git Push. The application is then deployed on Clever Cloud, an archive is created to ease its redeployment, and if all has gone well, it’s opened in your browser:
As with any application hosted within our service, you can simply assign it a domain that will benefit from our Sōzu load balancer and a Let’s Encrypt certificate, get its status and activity, stop or restart it.
The Console provides metrics and links to a Grafana dashboard to monitor its status. You can also adjust the size of the instance or activate auto-scalability to handle different load levels:
clever console

clever domain
clever domain add domain.tld

clever status
clever activity

clever scale --min-instances 1 --max-instances 4 --min-flavor pico --max-flavor M
clever scale --instances 1 --flavor pico

clever restart
clever stop
Let’s add a database to our chat-wtf instance
As mentioned previously, this project can store its data within PHP sessions, but also via SQLite or MySQL. In this example, we’ll opt for the latter to show you how it can be done, in a very simple way.
First, let’s create a MySQL database within your Clever Cloud account, linking it directly to your application. By default it’s a DEV instance, shared and free, but you can request a larger plan if needed:
clever addon create mysql-addon chat-wtf-mysql --link chat-wtfThis “link” allows connection parameters to be injected directly into the application using environment variables. These are visible in the Console or via Clever Tools :
clever envThus, all you need is to modify the settings.php file as follows to use it:
"storage_type" => "sql",
"db" => [
"dsn" => "mysql:host=" . getenv('MYSQL_ADDON_HOST') . ";
port=" . getenv('MYSQL_ADDON_PORT') . ";
dbname=" . getenv('MYSQL_ADDON_DB'),
"username" => getenv('MYSQL_ADDON_USER'),
"password" => getenv('MYSQL_ADDON_PASSWORD'),
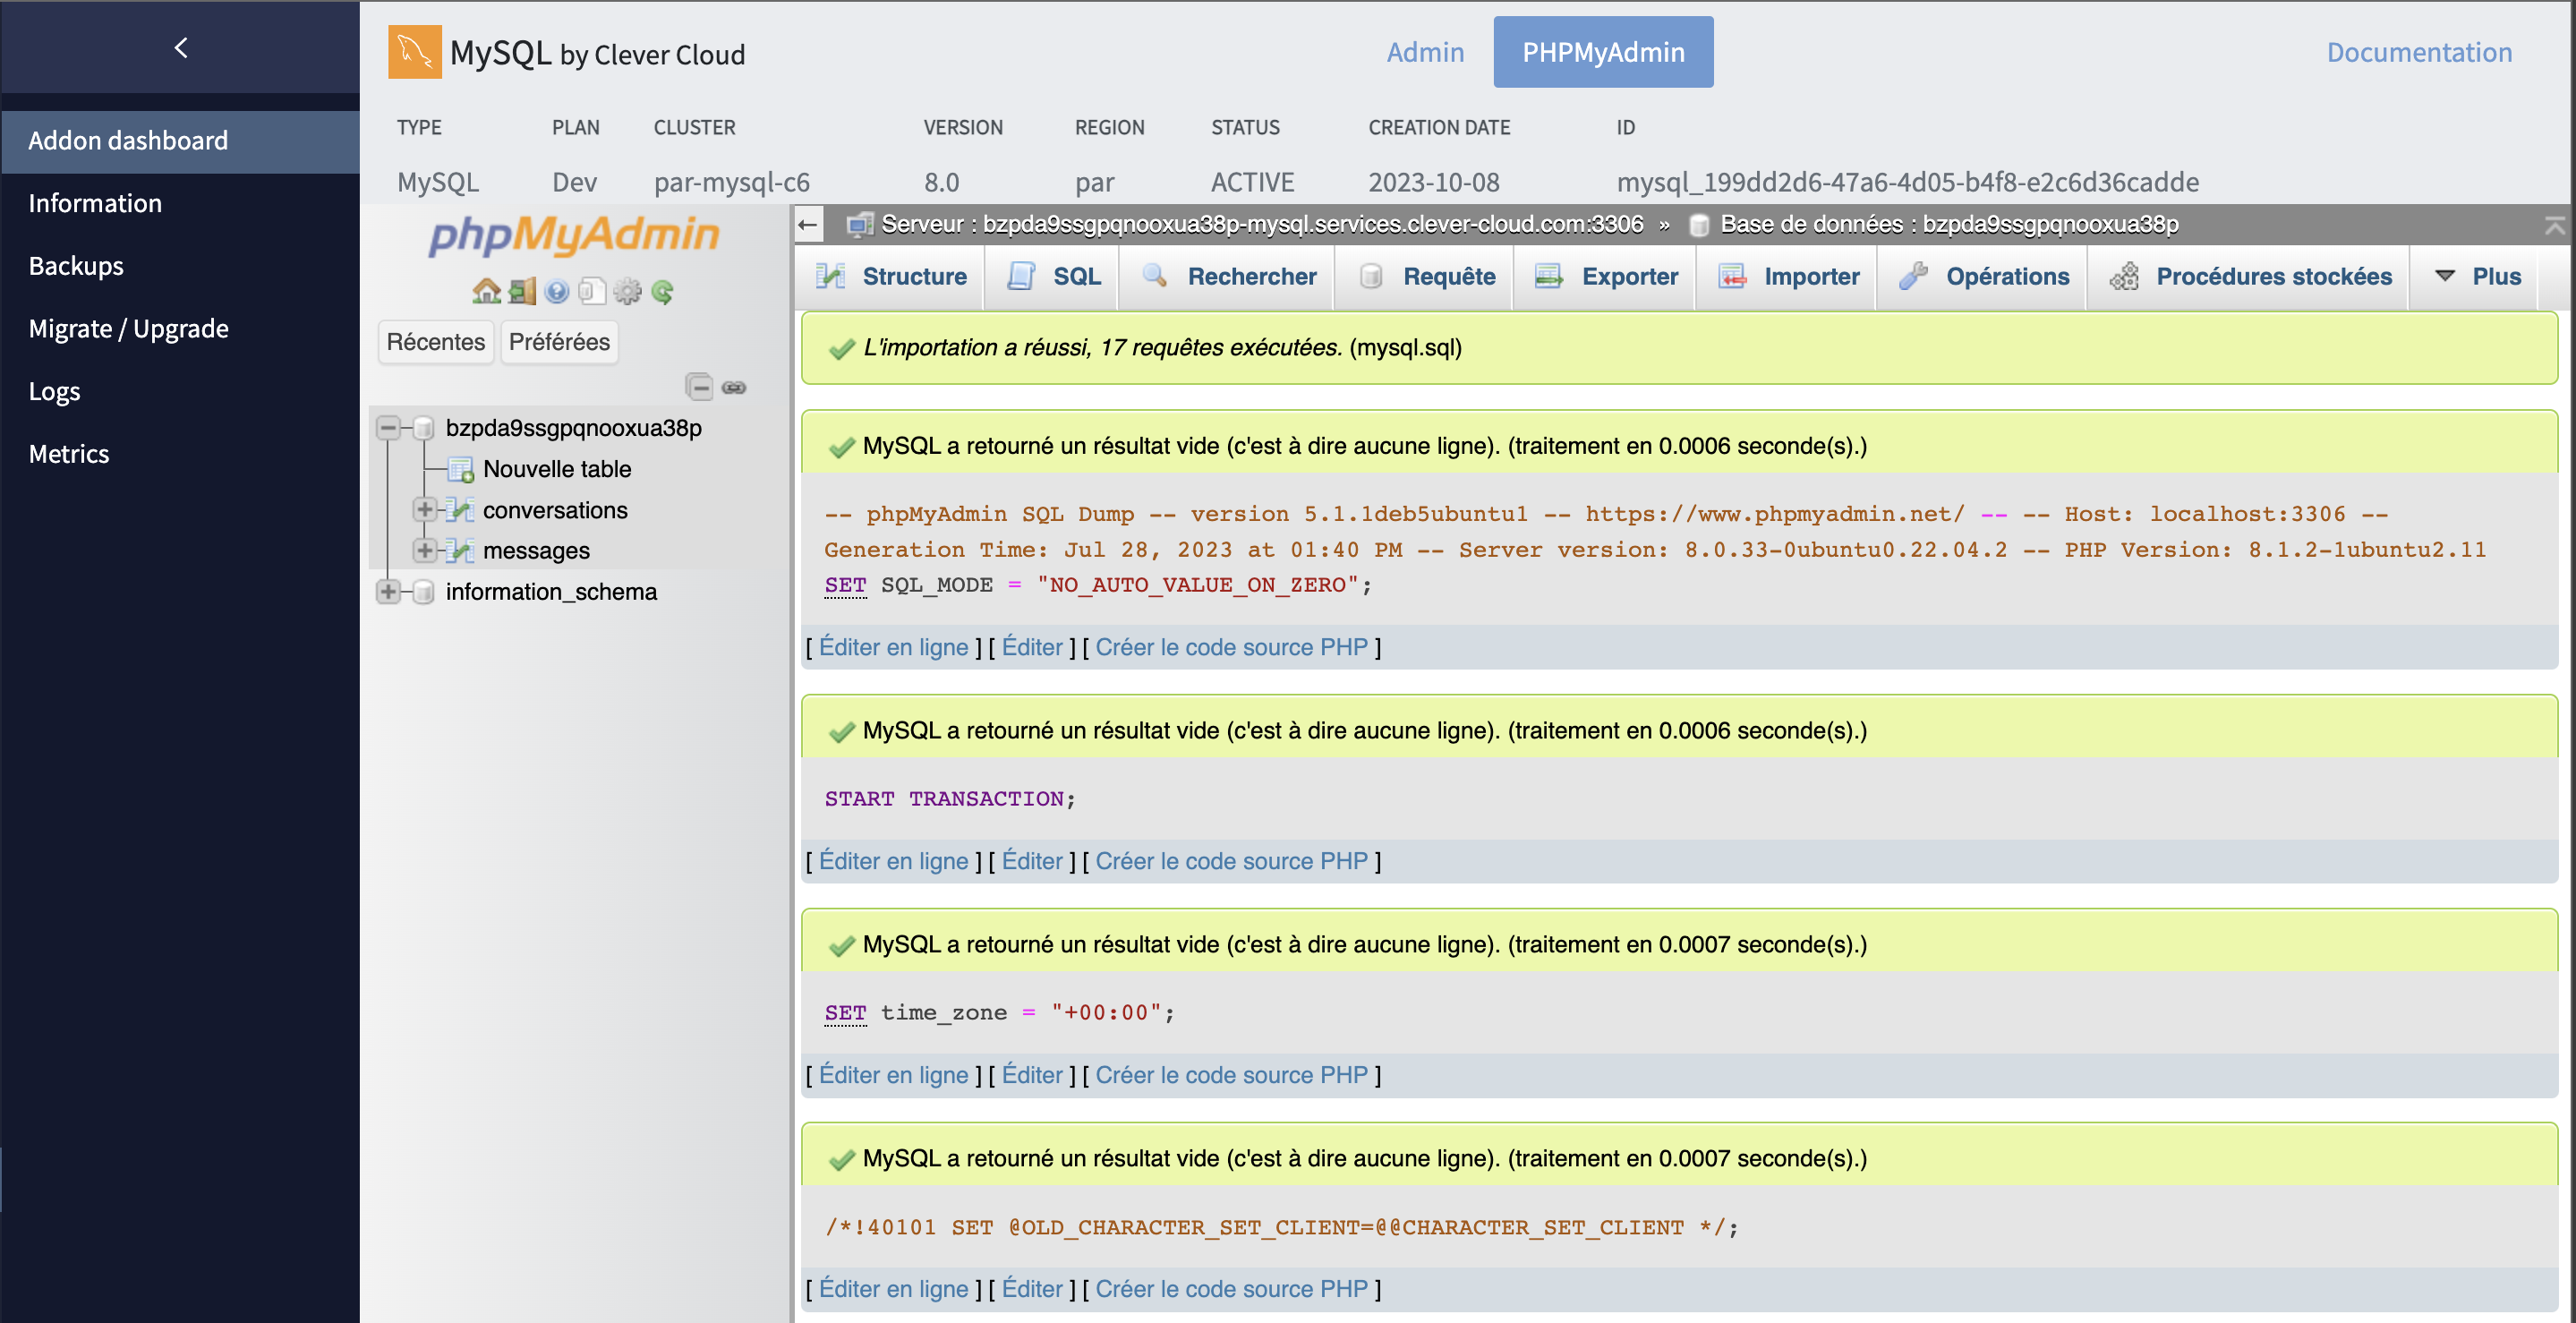
],Then go to the MySQL database dashboard, accessible in the Console. You’ll find a link to its PHPMyAdmin interface. Click on the database name in the left-hand menu, then you’ll get to the import function. This will enable you to initiate the DB structure by importing the mysql.sql file located in the repository’s db folder. Set its location and click on “Import”. You’re done:
You can also do this via a Shell script that checks if the database is empty, and import the default data if necessary. Create a file named init.sh with this code:
SSE="SELECT COUNT(*) FROM information_schema.tables WHERE table_schema='$MYSQL_ADDON_DB';"
PARAMS="-u $MYSQL_ADDON_USER -h $MYSQL_ADDON_HOST -P $MYSQL_ADDON_PORT -D $MYSQL_ADDON_DB"

TABLE_COUNT=$(MYSQL_PWD=$MYSQL_ADDON_PASSWORD mysql $PARAMS -sse"$SSE")

if [ "$TABLE_COUNT" -eq 0 ]; then
  echo "Database is empty, we fill it with the default data."
  MYSQL_PWD=$MYSQL_ADDON_PASSWORD mysql $PARAMS < db/mysql.sql

else
  echo "Database contains $TABLE_COUNT tables."
fi

rm init.sh
You'll need to run it during application deployment :
clever env set CC_PRE_BUILD_HOOK "bash init.sh"All that you remains to do is redeploy your application, which will now use the MySQL database to store its data rather than PHP sessions:
git add settings.php && git commit -m "Add MySQL support"
clever deploy && clever open
If this doesn't work, check errors in your instance logs on the Console or via :
clever logsWant to find out more?
To discover in greater detail the hosting PHP applications on Clever Cloud or our managed database services, come and meet us at the PHP Forum from October 12 to 13 at Disneyland Paris. We'll also be exhibiting at Devoxx Maroc and Volcamp: